
The projected future of the Awakening of the Wyrms…
Readers note that this is the conclusion to the Awakening of the Wyrms. This story was inspired by the writings of Tolkien, Iron Crown Enterprise’s Middle Earth Roleplaying game and Anders Blixt (https://gondica.wordpress.com/). Please read the Awakening of the Wyrms on this site before proceeding any further.
Also be advised that reading beyond this point may not be as satisfying as just leaving the future history of the Awakening of the Wyrms up to your OWN imagination. You have now been warned. For those that just crave a resolution then please proceed.
The Plot so far:
In the early fourth age, Aelindur, the Elvish daughter of Sauron, establishes spy networks and anti Gondorian alliances across Middle Earth. She plans to put herself on the throne of Gondor. Using palantiri recovered from Forochel she sends an advisor to Mount Gundabad to stir up the Goblins of the north. In doing so she discovers a powerful relic of Morgoth. Her spies also discover a hidden valley in the Grey Mountains that has spells designed to repel Dragons.
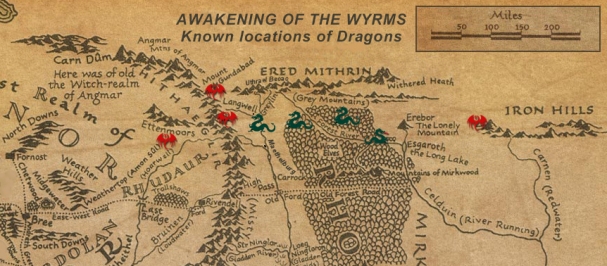
The allied powers unite to cleanse Mount Gundabad. King Elessar leads an army through Angmar, while Eomer/Thranduil/ Thorin Stonehelm lead the army of the Anduin to assault the eastern gate on the Gundalok plateau. Meanwhile Aelindur activates the relic of Morgoth to awaken the Dragons. Then her cabal of sorcerers use the hidden valley and the palantir to position the Wyrm ward over the Withered Heath. The Dragons are deliberately driven south and west.
Several dragons catch the army of the Anduin unawares and decimate it. Nearly a dozen Wyrms drive Men, Elves and Dwarfs from their homes across northern Rhovanion. The Drakes settle in new roosts from Rhudaur across the Misty Mountains and Mirkwood to the Iron Hills. Gondor and Rohan orient their forces northward allowing Aelindur to proceed with her plans in the south…
Awakening of the Wyrms – Conclusion
6- The Status Quo Undone
The ice thaws across North Western Middle Earth. It has been less than a year since Sauron’s Daughter Aelindur (the Queen of Shadows) used the Wind Thrones and the Ulûkai of Morgoth to awaken the Dragons of the Withered Heath. Free folk bask in the warm light and welcome the spring. Foul folk and darker things crawl forth from lair and hole and prepare for a season of terror…
The Queen of Shadows is satisfied with the progress of her plan. She continues to pull the strings as the forces she has set in motion grind inexorably onward. Using the two recovered Palantir, she coordinates with her son Fytaris who resides amongst the Goblins of the High Pass. Her step son Turinbar agitates the Dunmen, whilst her agents in Umbar and Harad need little prodding. Revolt is brewing.
Far to the north east in the Iron Hills, the Dragon Ruingurth dwells within the captured halls of Barukkhizdín beneath Barak-Shathur. The Fire Drake grows tired of constant Dwarfish ambushes and assassination attempts. One night, towards the end of winter, the old Wyrm mysteriously vanishes. The Iron Hills Dwarfs cautiously re-occupy Barak-Shathur. Ruingurth is thought to have flown back to the relative peace and quiet of the Withered Heath.
 At the first hint of spring, the Urulokë Khuzudrepa sallies forth from Penmorva in the Ettenmoors. He glides out of the rising sun and sacks the new fortress of Amon Sul. Many of the soldiers are slain and the top of the tower is knocked down. Survivors report mind bending hallucinations. Unable to fully wipe out the garrison or gain ingress to the keep, the beast eventually flies back east. The second re-building of Amon Sul grimly commences.
Heroes and folk inspired by tales of the Fellowship of the Ring, gather and sally forth into dark places. Groups enter dangerous and diverse realms such as Angmar, Rhudaur, the Grey Mountains and Mirkwood. One party of Rohirrim bring back the head of a lesser Cold Drake and some Breelanders burn out a troll-hole in the Ettendales but these are the exceptions. Most groups are never seen again and those few that survive return empty-handed, bearing only skerricks of useful information and nasty scars.
The High Pass is sundered. Large numbers of Goblins fortify both upper and lower passes as winter ends. Several caravans and three patrols are wiped out before the allies realise the extent of the problem. Probes from Imladris and Maethelburg are driven off. In summer the Elves and Northmen from either side of the pass assault and destroy the Goblin fortifications. Hit and run attacks continue from numerous new Goblin holes that have sprung up across the passes. Patrols take niggling casualties and caravans require heavy escorts. It has become necessary to clear the Goblin tunnels. The free folk plan a move on Goblin town for midsummer.
The siege of Goblin Town starts well with the Wolf Gate easily blockaded. Northmen, Elves and Beornings swarm the pass but the siege soon gets bogged down as the gate is nigh impregnable. The main gate to Goblin Town is a death trap and more luck is had in late summer via mining open the back door and a porch entry on the High Pass. Blue Mountain Dwarfs and refugees from the east are recruited for the tunnel war. Heroes emerge like the pick-wielding Dwarf Forlin, who kills a troll with one well aimed stroke to the skull. Volog the Goblin King uses prescient advice from the half orc Fytaris, to bleed the allies. Volog becomes well respected amongst Goblin-kind.
The tunnel war slows down when the Goblins collapse access passages to the allies’ entry points. The bitter underground fighting begins anew as the Dwarfs dig through the collapsed passages. Volog opens new shafts, back doors and bolt holes. Many Goblins secretly withdraw to nearby holds in Rhudaur, or north of the Eagles Eyrie, and conduct raids into the allies supply lines. Aelindur ponders schemes to bring a Dragon down atop the mannish fortified camp outside the caves, while her son Fytaris acts as a military advisor to the Goblin folk.
Soon enough Aelindur turns her magical eye elsewhere to ferment her schemes. This is what Elessar has been counting on. Using the palantir Elessar and Radagast perceive Aelindur’s scrying and see something of her plans. They warn Rohan of Dunnish trouble and put the frontier with Harad on alert. Aelindur in turn entraps a Gondorian seer using a palantir and mind warps him to act as her spy.
Faramir and a party of Arnorian soldiers attempt a mission to the Barrow Downs. They are accompanied by Radagast and Glorfindel. The Elf Lord bears the key to the Mound of Chieftains, a huge Edain burial within the Barrow Downs that contains powerful relics. The group causes a stir when they meet in Bree, and Aelindur’s spies send her urgent messages.
Faramir’s company soon depart and ride into the downs at sunrise. They locate the Mound of Chieftains and Radagast dispels the deadly Wight magicks surrounding the tomb. Glorfindel unlocks the door, disarming the traps. 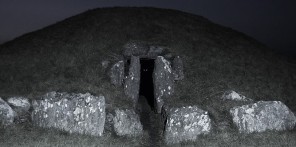 Three Greater Barrow Wights lurk in the shadows within, but the soldiers are ready. All bear enchanted heirloom weapons of Gondor or Rivendell. Combined with the power of Radagast, and the might of an Elf Lord, the fell spirits are banished to the outer darkness.
The barrow’s wealth is carried outside. Many powerful relics are recovered to be distributed to Gondorian or allied fortresses. Most importantly, Sulring is found: a sword enchanted to slay Dragons, according to the lore of both Gondor and Rivendell. Glorfindel recognises the weapon as one which slew the Cold Drake Rylarth in the First Age. The relics are taken but the remaining wealth is left upon the sward to complete the cleansing of the tomb. Rumour of this practice leaks out and many an Eriadorian is led astray on the downs meeting a grisly end at the hands of Wights.
After much discussion, Faramir wisely bequeaths the Edain sword to the Elves of Rivendell who now dwell in the shadow of Khuzudrepa and Daelomin. Aelindur’s spies dare not attempt to take it from the ancient Noldor Glorfindel. Other relics are sent to Annuminas, Amon Sul, and Minas Tirith. Radagast advises Faramir to send a magical lance to Elfwine at Maethelburg.
Radagast then rides west to visit Tom Bombadil. Here the Istari learns that old Tom has actually met the Queen of Shadows! Radagast recounts the Eldest’s tale…
“Aelindur she is named. She visited a dozen winters gone and tarried here with Goldberry and I. Her charms are many and twas not til Goldberry said she must go, that I perceived her art. Such a chastening from my lady I have not had for many an age. That one is full of mischief, but perhaps even her meddling will be of some good one day.”
Bombadil also reveals that his presence is not purely one of aloof isolation. Aelindur possesses an item which allows her power over undead. She has recently attempted to control the Barrow Wights, a terrifying prospect, but Tom’s magic maintains the status quo. The Wights are bound to the Tyrn Gorthad as the Eldest dictates.
Tom knows not where the Queen dwells, but now Radagast has a name and knows the Shadow Queen is a powerful Elf. Radagast alerts the western powers and sends out his own spies seeking the Elf lady.
The Earth Wyrm
Disturbed by the Awakening and the migration of larger Dragons, the lesser Cold Drake Thraxus flees from the Mount Gram area. It gradually slithers west and stealthily traverses the Weather Hills. Thraxus crosses the Brandywine near the Hills of Scary and wriggles into the Shire. One evening it comes unexpectedly upon the village of Scary. The Wyrm collapses the Inn of the Jolly Ewe then hunts down the fleeing shire-folk. Burrowing deep into smials, more than a score of Hobbits are devoured and the Dragon teases the ‘fat shire maggots’ in what will be known as the ‘Scary Scare’. A hue and cry is raised but the Wyrm is gone by sunrise.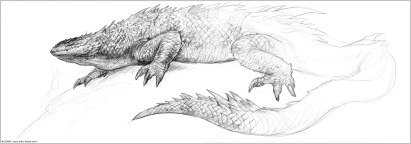 By the time word reaches Hobbiton, let alone Michel Delving, Thraxus is hidden in the hills. Confusion and disbelief reign. The next evening it strikes at Brockenborings devouring several more families in their own holes. Now the panic really sets in. Much of the East Farthing north of the Water is evacuated. The Shire militia is raised, messages are sent (north to Annuminas, East to Bree and south to Sarn Ford) seeking assistance from big folk.
Pippin, Merry and Sam gear up and lead large units of spear and archer militia converging 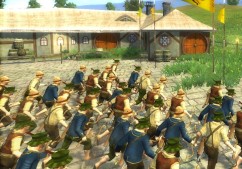 on the Scary region. Pippin quickly races towards Brockenborings leading a large force of Tooks and a contingent from Bywater. Two Rangers are welcomed by Mayor Gamgee as he marches with the steadily accumulating West Farthing muster. The Brandybuck militia is joined by a small company of Arnorian soldiers from the Brandywine Bridge guardhouse. They reach Scary first and scour the devastation of the Earth Wyrm, careful to stay in large groups.

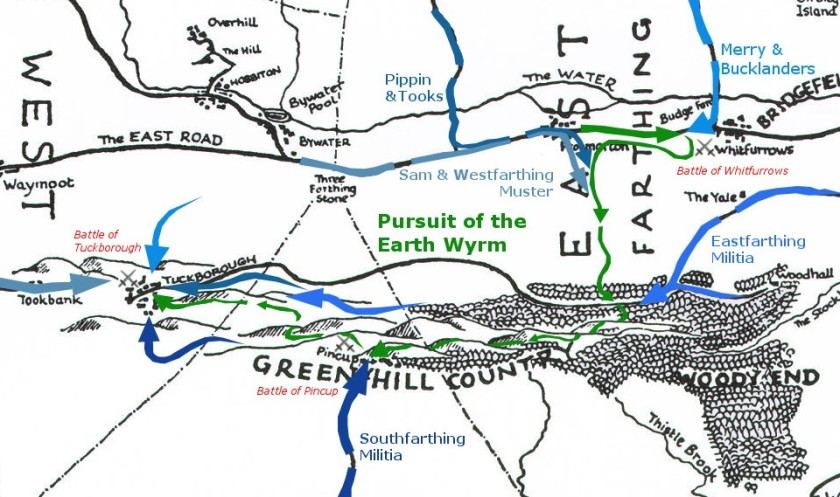
As more Hobbitry-in-Arms converge on Scary, the Wyrm goes to ground. On the evening of fourth day, a company of Greenhill hobbits unexpectedly encounter the Drake well to the south, crossing The Water near Frogmorton. The Halflings scatter and the few that escape sound the alarm. As the armies in the Scary region are rousted out of bed, Frogmorton is attacked by the rampaging Wyrm. The reduced Frogmorton guards attempt a spear hedge but the Drake is too quick and ferocious for the little folk. They are driven off at great loss. Accounts of the destruction of Frogmorton mention the sadistic laughter of the Drake as it wriggled and burrowed into smials, trapping Hobbits.
The Tooks led by Pippin counter-march south all night and link up with the Westfarthing militia, led by Samwise, west of Frogmorton. The Buckland militia recross the Water to the east at Budgeford later that morning. They are just in time to intercept Thraxus chasing refugees on the road to Whitfurrows. The Wyrm barks insults at the 400 Hobbits who return barbs with a hail of arrow fire. A cold squall of rain sweeps in from the north and the Wyrm charges!
Arnorian soldiers bolster the wavering Hobbit spear hedge. The enraged Drake, pin cushioned with arrows, crashes onto the spears and a terrific confused melee erupts. Deadly serious hobbits and the few brave guardsmen mob the Drake. Meriadoc Brandybuck entreats the Hobbits to defend the folk of Whitfurrows behind them no matter what. They jab again and again at the thrashing monster refusing to give way, until at last the beast turns tail and flees west along the road into the drizzly blow. Behind him more than 100 lay dead or gravely injured. Meriadoc Brandybuck loses an arm but it is said that it was his thrust with a Gondorian blade into its palate that finally convinced the Wyrm to flee. The maimed veteran of the Pelennor Fields orders the militia to pursue to Dragon, and will himself re-join the hunt a week later, eager for revenge.
Thraxus encounters the main force of Hobbitry-in-Arms late in the afternoon that same day. Nearly 1200 Hobbits, several rangers and a lance of knights of Annuminas are arrayed outside the ruins of Frogmorton. Thraxus, chastened after the Battle of Whitfurrows, flees south towards Greenhill country. The army pursues but loses the Drake in the fading light.
Over the next week the armies of Hobbits track and chase Thraxus south and then west through Greenhill Country. Samwise and Pippin coordinate the tracking and hunting of the Wyrm. They are assisted by a growing company of Rangers, Hobbit bounders and even a small group of travelling Elves. Thraxus eats a scouting party in the forests south of the road but large armed groups close in and drive the Wyrm before it. The Southfarthing militia fights a short battle with the Dragon outside Pincup before it flees west again. 13 days after the ‘Scary Scare’ the injured Drake is cornered in Tuckborough. Thraxus crawls into the smials to avoid the concentrated archery.
A rash party of Tuckborough stalwarts attempt to take the fight underground but the Earth Wyrm snaps them up and spits them out. The cold drake refuses to emerge from the earth. Samwise is ready for this eventuality. Barrels of oil are poured into the chimneys and set ablaze. When this fails to flush him out, powdered quicklime is poured down chimneys and billowed into doorways. Within seconds Thraxus erupts from the hillside. The massed archers of the Shire are arrayed and ready. The Wyrm is brought low by the arrow storm and then finished off by lances of the Knights of Annuminas.
The battles of Whitfurrow, Pincup and Tuckburough become immortalised as part of the Earth Wyrm lore in the Shire and lead to a renewal of interest in militia training not seen since the Battle of Bywater. More than 200 Hobbits and a dozen men have been killed by the Wyrm. Four towns are wrecked and almost the entire Shire’s harvest season has been disrupted. And this was just a minor drake, a mere 40 footer, as they come to say around the bar of the Green Dragon.
Plots Aplenty and a Victory of Sorts
Itangast’s depredations make food supply to the Lonely Mountain tenuous. As Erebor starves the Dwarfs attempt to buy off the Dragon with a huge pile of gold, left outside the gate. They secretly hope to slay the Wyrm in a ballista ambush. But Itangast is too clever by half. He uses crebain to thieve a portion of the heap whilst spreading damaging rumours about Dwarf betrayal to the Lakemen.
 Refugees from the Dale and Esgaroth have settled at the Celduin Ford and along the Forest Road. Some travel as far as the Old Ford over the Anduin or south to the East Bight. Haurnfile lairs in the Mountains of Mirkwood only two days march from the Old Forest Road. Dale folk settled within Mirkwood are alerted to the Dragon’s presence by birds who speak to Bard’s descendants. The village is soon abandoned save for a few desperate folk. Hraunfile passes through within a week but keeps moving south. The folk who remain survive by hiding in a cellar. They later establish the fortified inn of ‘Midmirk’ that begins to prosper from the frequent travellers between the Anduin and Carnen valleys.
In Minas Tirith Aragorn and Arwen are surprised by a letter from Samwise Gamgee. The Shire Mayor proposes a radical solution to the Dragon infestation – a quest for a most lethal toxin. Elessar and Faramir consult then quietly search for volunteers. A month later a group of soldiers, mercenaries and adventurers embark on a dangerous mission into the Ephel Duath. They are seeking a poison that will slay a Dragon. They hunt for Shelob!
At great peril the volunteers track down the malignant demon spider in the tunnels of Cirith Ungol. Nearly a dozen heroes of Gondor die on this mission and the horrific arachnid survives the encounter. Shelob flees, nursing yet more wounds, into the Underdeeps. But the adventurers recover a phial of her most toxic venom. King Elessar rewards these few survivors and promptly sends the phial north to Maethelburg where it may be of some use versus the Wyrms.
Far to the north in the Grey Mountains, the Werewolves of Uthrael Beoac seduce their captive mage Calindel, the daughter of Aelindur. Via unholy magicks and with her part Maia bloodline she survives the transformation to Werewolf. 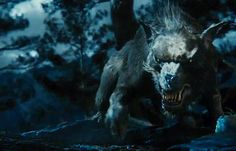 Calindel joins the pack and at the autumn equinox succeeds in activating the Wind Thrones. The Dragon Ward is re-established upon the mountain valley. Several lesser drakes are driven south out of the valley and into the Grey Mountain Narrows. But without a Palantir she cannot focus the effect elsewhere. The pack remains vigilant and hunts down explorers entering the valley.
Aelindur detects the Ward activation and scrys her daughter’s predicament. The Queen of Shadows is too busy to attempt any rescue, and suspects Calindel may not want rescuing anyway. The magic wielding Wyrm Daelomin also senses the use of the Wind Thrones and begins a search of the north. She has detected the magical manipulation of Dragonkind but is unsure where it emanates from. A week later she senses related magic use at Sarn Goriwing, in the Mountains of Mirkwood. The winged drake captures the tower and interrogates the evil sorcerer who dwells there. He reveals some of what he knows of Aelindur and tries to sway the Urulokë to join them. The Dragon eats him.
Daelomin flies north into the Grey Mountains and finds Uthrael Beoac. She forces herself into the warded valley and confronts the Werewolves beneath the northern Wind Throne.  The small but deadly pack of ancient Werewolves and the power of the ward is too much for the furious Drake to stand against. The Ghost Wing flees. She deliberately starts an avalanche which partially destroys one of the Thrones but this is not enough to disrupt their power. The Dragon returns to her new lair in the Misty Mountains. She plans to seek out Khuzudrepa, another powerful Dragon spellcaster, to enlist his help.
Meanwhile Khuzudrepa, is gloating after his sacking of Amon Sul. The Drake is bored with tormenting the Goblins of Gram and roves southward seeking out Rivendell. The valley’s fading enchantments hide it this time but a party of wandering Elves are spied and eaten by the Wyrm. The Lords of Rivendell abandon their live-and-let-live policy towards the Dragon of Penmorva.
Glorfindel, Elladan and Elrohir ride northwest into the Ettenmoors mercilessly slaying trolls in their wrathful passage. They confront the Dragon where he lairs in the ruined fortress. Elrohir and Elladan distract the Wyrm with spitefully accurate shooting while Glorfindel lurks off to the side. The Wyrm’s mind-bending sorcery freezes the sons of Elrond. As Khuzudrepa rushes upon them, Glorfindel darts in wielding Sulring. The enchanted sword hamstrings the Dragon, who furiously turns about. Glorfindel leaps high and slashes open the Wyrm’s throat. The ancient Drake’s life is over within seconds of encountering the enraged Elf Lords.
The people of Eriador rejoice at the news, as do the Goblins of Mount Gram. They are now free to rove out of their mountain fortress.
While Glorfindel begins a fruitless year long quest hunting Daelomin in the northern Hithaeglir, the road-fort at the Mitheithel Bridge is taken by a force of Orcs & Trolls out of Mount Gram and Cameth Brin. Several weeks pass and many travellers are killed before this is discovered. Combined with the disaster of the High Pass, few are now inclined to travel the Great East Road. It is another month before Breeland Militia, Arnorian soldiery and Elves from Rivendell can recapture the fort. Some 100 Orcs are killed in the brief siege, but the bulk of the original force had long since withdrawn north. The fort is rebuilt with a taller wall, a stone keep and alert beacon. Even so, the Goblin presence in the Trollshaws makes this stretch of the Great East Road more hazardous than when Khuzudrepa was alive.
Spy Game 1
Radagast assists in clearing the Mithethiel fort then accompanies some Eriadorian adventurers over the High Pass. He visits Maethelburg with the intention of moving on to Rhosghobel. In the fortress town he notices an unusual glamour upon an itinerant Northman. The wizard recruits the adventurers and they capture Aelindur’s spy in Maethelburg. After subtle questioning they uncover the coded mail he sends to an address in Edoras. The spy and his possessions reveal that he serves the Shadow Queen. He also admits that the Awakening of the Wyrms was made possible by information from an Elf called Delucardh from the Elvenking’s halls.
This information leads to two separate quests. Radagast will travel alone to Thranduil’s halls in search of the Elf scholar, Delucardh’s work. The adventuring party will go south to Edoras to hunt down the next link in the spy network.
Before they can depart, larger events overtake them…
Continued in part 7 – The Storm Breaks
